|
Download PDF Version
The User’s Guide of Opanda
DigitalFilm 1.68

INDEX
Key Features:
- Photography reversal film simulation
- Support RAW file format (CANON, NIKON, FUJI, KODAK, MINOLTA,OLYMPUS and more)
- Powerful Exif Editor V2.21
- Making index sample
- Adjustment, Watermark, Signature, Frame, Histogram
- Support batch process
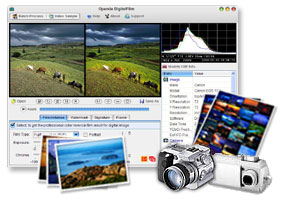
DigitalFilm is professional software for emulating the photography reversal film. It
is the publication meets the requirement in photography, printing and handling digital image.
It can make the color effect of digital photo realistically simulate that of
photographic reversal film such as Fujifilm Velvia(RVP) and Kodak T-Max100. It can make the image clear and vivid, and bring the image strong and
perfectly clear colors, rich layers and details, as well as the reduction of noise points and color spots...
With the world-leading Exif Maker editor inside, DigitalFilm supports the updated
Exif 2.21, it allows the users to add, to modify and to delete every Exif maker freely, it also supports TIFF & JPEG.
Moreover, the 8 main function of DigitalFilm: making index sample, image adjustment,
watermark, signature, frame, histogram and printing the Exif photographic parameters can provide the digital camera
users an all-round bolster intheir daily use.
- OS: Microsoft Windows 98, ME, 2000, or XP
- CPU: Intel Pentium-class processor or equivalent (PIII 500+ recommended)
- RAM: 64 MB RAM
- Video Card: High Color (16 bit) or higher display adapter
- Display: 15” 800×600 or later
- Hard disk: 3 MB free disk space
- Browser: Microsoft Internet Explorer 5.0 or later
Open the installing file of DigitalFilm full version, as the following snapshot:
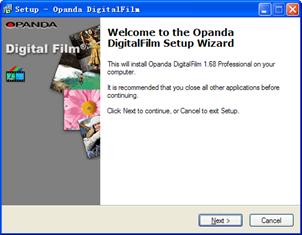
Click “Next >”, and prepare to install the software:
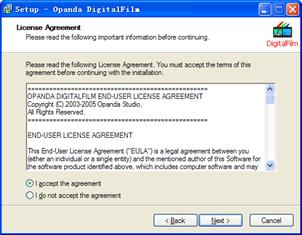
Read the agreement and choose “I
accept the agreement”, then click "Next >", start to install software:
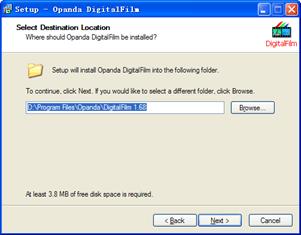
Find a fitting folder to install the software. The sample will install as default.
Click "Next >", installing. Wait a second, click "Finish". Ok, you can use the full registered version software
of DigitalFilm.
Click "Start" → “Programs”
→ “Opanda” →
“Opanda DigitalFilm 1.68” → “Uninstall DigitalFilm”, start to remove the DigitalFilm
from your system.
Click "Yes", work for uninstalling software. When the following window appears, just
click "OK".
Key Features:
- Photography reversal film simulation
- Support RAW file format (CANON, NIKON, FUJI, KODAK, MINOLTA,OLYMPUS and more)
- Powerful Exif Editor V2.21
- Making index sample
- Adjustment, Watermark, Signature, Frame, Histogram
- Support batch process
* Bran-new intellectualized algorithm for imitating reversal
film
The processed image keeps pretty detail, rich color. Whether color or B/W, the
result is same realistic and appealing.
* EXIF Editor supports the newest 2.21 of standard
Support TIFF & JPEG format images completely, modify Exif data freely, including
main camera brand and type all of the world.
* Make the standard formatted Index Sample to print
Index image maker can create types of index photo measure up print standard in
seconds.
* Gapless and free watermark, signment and border
Specially, Exif macro allows user to add information in the photo about taking photo
follow your inclinations.
* Full-function batch process
Each function of DigitalFilm can be use by itself, or select some of them. It's so
easy to process a great deal of images by the batch process.
DigitalFilm includes Fujifilm Velvia (RVP) and Kodak T-Max 100 simulation. It allow
user batch process a great deal images in one time. It is a best tool for professional photographers and business users,
and digital camera users can improve their digital photo. DigitalFilm supplies lots of handy function, and result is
excellent.
Click the "Open" button in DigitalFilm main interface, to open the files browse
window. Select a image file to process, double click the image file or click "Open" button.

Otherwise, DigitalFilm allow user operating image as the way by drag and drop, copy
and paste.
Each image in DigitalFilm, whether original, result, histogram, or image area in
watermark and signment, DigitalFilm also allows user using these handy operation. In this way, you can work it with
other graphic editor software gaplessly instead of saving and opening image time and again.
DigitalFilm offers some adjustment function, "Resize Image", "Rotate Right", "Flip
Horizontal", "Flip Vertical" and "Clear Screen"
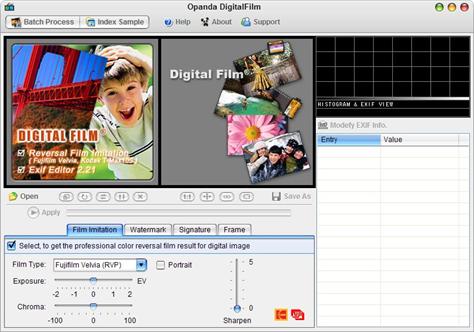
This is the operating interface of reversal film simulation. There are two types of
reversal film in the drop list, Fujifilm Velvia (RVP) and Kodak B/W T-Max 100.
At the right of drop list, there is a option about portrait. To tick it for
processing a portrait photo.
At the right of Kodak B/W T-Max 100, there are two options, one is light priority,
the other is proof black. To tick the first option, the result will keep down more detail on light area of photo. If the
result appears more red in your screen or print photo, please tick the second option.
Exposure help you about your underexposureh or overexposure photo. Use it carefully,
less should lose detail in light and dark part.
Chroma allows user to adjust color of result richer or thinner.
Sharpen lets image be cleaner
After openning image in DigitalFilm, setup your parameter, click "Apply", a little
second, you can look at the result. Of course, you can use the default setting. The use is very easy, isn't it?
Click "Save" to save the result. The default setting will save the image by "DF_" +
original file name.
Select the file format as “JPEG”, click "Save", the following window will appears:
Select better image quality, the result file will be larger. Tick the option of
"Save EXIF information" will save the EXIF data with image together.
If you select the file format as "TIFF", the following window will appears after
click save botton.
Tick option of "LZW" allow the file size will be smaller and keep the same image
quality.
The watermark tool add a photo or character as logo in the image.
Location frame inclodes the items of horizontality and verticality. Adjust the
"Align Left", "Center Horizontal", "Align Right" and the "Align top", "Center Vertical", "Align Bottom" and "Offset",
the logo image can be located in the digital photo.
The value of opacity decides transparency of watermark, the value is from 0 to 100,
0 of value is translucent completely.
In the image as logo, user can set one kind of color translucent. For example, the
space area of logo image is a single kind of color, then the space area will be translucent appointing a given color by
picker. The logo will inosculate with photo closely setting opacity.
The introduction of function about character is in the part of signature.
The function can add character or image to the photo as a logo or mark, the default
value is character signature.
The function of "location" and “opacity” in signature is same as in watermark.
"Set text font and color" just like normal word editor. Specially, when set word
white, the background color will display black automatically.
“Insert image and Exif parameter”, allows user select some macro label of EXIF as
note of the photo. The way will save you a lot of time instead of copying and pasting the data of EXIF by using macro
label.
The standard format is <label name/>, the label name is standard EXIF name. Of
course you can modify this character by yourself if you can type these macro label correctly. When you put in these
labels, the software will read the value of these labels and instead of them. You still can set these labels color and
font just like normal character.
The introduction of about image logo is in the part of watermark.
It adds all kinds of simple frames for image.
First, you'd better know two concepts, "underlay" and "border". Just like mount a
picture, the edge of picture will be packaged and then be pasted in a board larger than the original. We call the board
as underlay and the packaged edge as border.
Either "underlay" or "border", they all offer to set the width of each edges alone.
You can select "Equally" and set some one edge width, the value of other three edge will follow the first edge width. If
the value of one edge is zero, it means there is not any pixel of edge can be looked.
The user can use simple color or image as underlay. We suggest to choose a texture
picture or the current original image as underlay. At the same time, you'd better use a image larger than the original.
"Border" only allows to use simple color. The use way of "Opacity" is same in
"watermark" and "signature". To tick "Inner Image" and to set "Opacity" rightly will bring a special effect.
The function panel still set two common-use value in advance, "Black frame on white"
and "White frame on black".
Exif maker is the best exif data editor in the world. It supports the newest
standard of exif 2.21, and supplies items as "Lens", "Film", "Filter Lens", "Scanner", "Flash lamp" for film
photographers specially. You can select item from drop list instead of filling data.
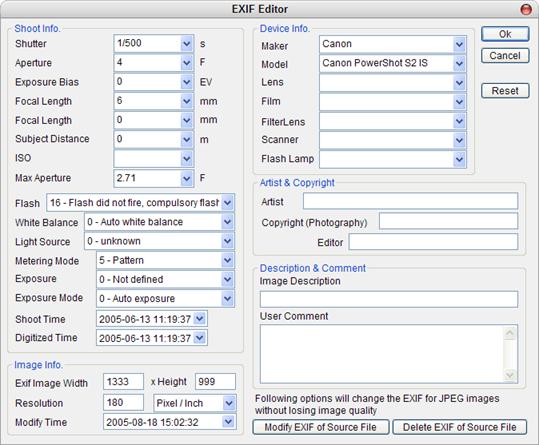
Click "Modify exif of source file" or "Delete exif of source file" to change the
exif data of image file and image file quality will be not losed.
You can make a professional standard index photo in a short time by this function.
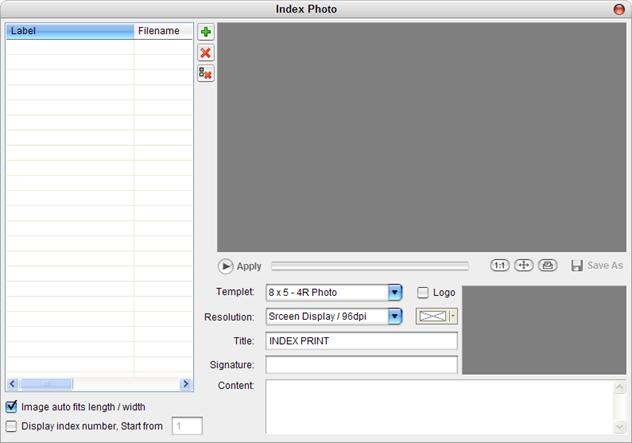
There are three partments in the tool. They are "Image List", "Preview Image" and
"Option Setting".
The "Add" button of Image List is to load a batch of image files want to make index
photos.You can pitch on one image file and click "Delete" button to unload it from list. You also click "Delete All" to
clean the list for reload another files.
There are three items in the list, "Label", "File Name" and "Path". The "Label" is
the title of image in the index photo, default is file name.
To tick "Image auto fits length / width" makes every image fits the whole photo, it
seem to be more orderly. To tick the next item will assign number automatically, of course the user must fill in a
number of the first image in the index.
There are ten kind sizes of samples in the "Templet" list.
Resolution includes five types of items for screen display or printing.
The user can fill note in "Title", "Signature", "Content" to record information for
the index photo.
To tick "Logo" and load a image as logo of the index photo. The software supports
transparence of GIF and PSD format, otherwise, you can set "transparent color" to appoint one color as transparence. The
introduction of function about it is in the part of signature.
Finish the upside setting, click "Apply", the result will be made in preview image
window, then you can save the result image.
Batch process is a excellent tool to process a great deal of image files as same
purpose for users. It will save more time expending in humdrum same work.
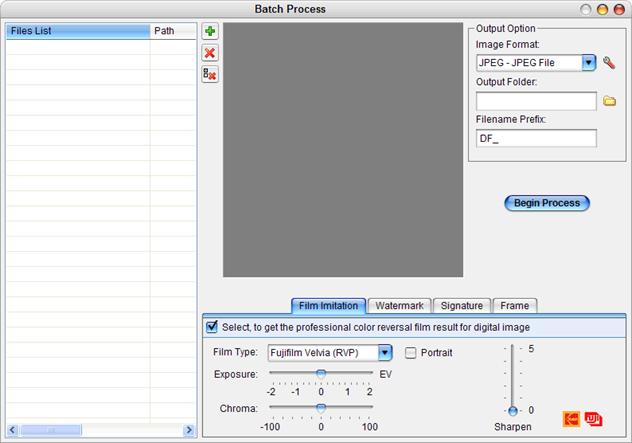
In left side of interface, it looks like image files list of index sample window.
Up the right side, there is preview area of original and output setting. The setting
rules the saved image format, rule of name new image file, location saved new file in hard disc.
Under the right side, the interface is same to control panel of the main interface.
The user can select one or more items to process files. By these ways, the DigitalFilm will be a super powerful tools.
The histogram can display the exposal information of the opening digital photo in
DigitalFilm.

From left to right it display a process from black to white, it includes all steps
of gray level. The white peak value means the proportion of this point of B/W gray level. The curves of red, green, blue
mean the three colors of RGB.
The user can copy the histogram by clicking the right menu of mouse, and paste the
other place.
Under the histogram, there are some neat photo information. They are exposure mode,
shutter time, aperture, exposure bias, focal length, ISO, white balance, image size, resolution, shoot time.
As the image file is opened in DigitalFilm, the system will unscramble the exif
information of the image file at once. The list of exif information includes multi-partments, "Image Info.", "Camera
Info.", "Thumbnail Info.", "File Info.", "MakerNote Info.", "GPS Info.", "IPTC Info.".
These data appears all information of image file opening in DigitalFilm, it helps
user to know more about the image. The user can select "copy", "delete", "delete exif", "select all" of the right-key
menu.
There are three ways to preview image in DigitalFilm windows, "Full size", "Fit
size", "Full screen mode". The "Full screen mode" will be introduced detailedly later, now recommend the other ways.
"Full size" will appear the actual image size of original and result at the same
time.
"Fit size" will appear the fit-window image size of origital and result at the same
time.
"Synchronise the displays of preview and original" will make appearance of result
image synchronize as original image.
Click "Full Screen Mode", enter the full screen mode to view image's original and
result.
Shortcut Key:
Tab/Space: switch to next browse mode
1:
view original by full screen mode
2:
view result by full screen mode
3:
view contrast images by
4:
view contrast images by
PageDown: switch to next browse mode
PageUp: switch to last browse mode
Ctrl: view result as same anchor
with original
Esc/Enter: exit full screen mode
“Tab” and “Space” are keys to shift display mode, the display mode are "left and
right(3)", "up and down(4)", "original(1)", "result(2)", of course you can directly hit the
number key 1,2,3,4 to select the display mode you want.
The function of “PageDown” key is same as up “Tab” key and “Space” key, the function
of “PageUp” key is reversed as “PageDown”。
The function of “Ctrl” key is same as the function of "Synchronise the displays of
preview and original" in main interface. At the third or forth display mode, press out the “Ctrl” key, drag the
original, the result will move with original in phase.
Hit the “Esc” key or “Enter” key, exit full screen mode, go back to main interface.
DigitalFilm is a shareware product. You may copy, distribute, and try it for free,
but if you hope to get full functions after evaluate the trial version, you must register. You will receive a valid
license, a registration key and the latest full release.
We accept VISA, Mastercard, Discover, American Express and PayPal online. When you
purchase you should get a confirmation email with a registration key to unlock your trial copy. If you did not, please
email us opandasoft@hotmail.com with your order number and we will send it you
immediately.
Please visit the official website of Opanda DigitalFilm for get retailed payment
information: http://www.opanda.com/

First time you start DigitalFilm full version, the register window will pop up. Fill
in the register information which we provided in blank box, and click “Register”, you will begin to use DigitalFilm.
Opanda Studio
_______________________________________________________________________________
Copyright © 2003-2005 Opanda Studio. All rights reserved.
URL: http://www.opanda.com/
Email: opandasoft@hotmail.com
|